AX7 development tools without VM

If you want to run and/or modify AX 7 (Dynamics 365 for Operations), you get a whole virtual environment configured by Microsoft and you either deploy it to Azure or run as a local virtual machine on Hyper-V.

I have a huge laptop with 32 GB RAM and two SSD disks built specifically for running AX 2012 and AX 7 VMs and I also have a few environments in Azure (my MSDN subscription gives me some credit for Azure every month), therefore I have all I need for development. But sometimes I don’t have access to these environments, such as when I travel just with a small laptop, and I would still like to review some X++, verify something when answering questions in forums and so on, and having AX development tools with me would be a great help.

I tried it and found that setting it up wasn’t very difficult, as I’m going to show below. Just let me make it clear – I’m talking about having access to Application Explorer, projects, designers and code, not about building and running Dynamics AX. It would be possible, but it would require more effort and my small laptop isn’t even powerful enough to do that. When I want to develop something, I use one of my proper development environment.

First of all, you need a machine with Windows and Visual Studio 2015. To show the process from the beginning on an empty box, I’ll use a virtual machine in Azure based on the image called Visual Studio Enterprise 2015 Update 3 with Universal Windows Tools and Azure SDK 2.9 on Windows 10 Enterprise N (x64).

Files and website

We won’t build the environment from scratch – we’ll copy the application from an existing development environment. Go to an environment you want to copy, find the folder containing packages and WebRoot (most likely J:\AosService), make a copy and put it to your machine. In my example, I’ve put it to c:\AX7.
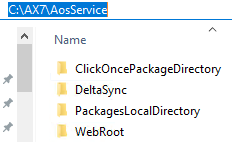
Find web.config file inside WebRoot folder and update paths according to the new location. Edit > Find and Replace > Quick Replace (or just Ctrl+H) in Visual Studio will help you with it.

Then create a site referring to WebRoot. Because IIS isn’t enabled by default, go to Windows features and add it.

Open IIS manager and add a new website.

Set the name to AOSService, Physical path to the WebRoot folder (C:\AX7\AosService\WebRoot in my case) and Port to something that isn’t already used.

We’re not going to run the website; it’s here just for Visual Studio to locate configuration. If we wanted to actually run it, we would have to pay much more attention to the configuration of both the website and the application pool.

Visual Studio tools

When you have files and the service ready, it’s time to install the Visual Studio extension containing all tools for AX (Application Explorer, project types, the menu and so on). Download a binary update from LCS and extract it to a folder (D:\AllBinary71Update3Updates in my case). Then go to DevToolsService\Scripts, find Microsoft.Dynamics.Framework.Tools.Installer.vsix, double-click it to start the installation and walk through the installation wizard.

If you want to be able to create AX projects (which may be useful), you also have to copy MSBuild target files (which are references by project files) to the expected location. You can do it, for example, by executing the following Powershell script (with the Script folder as the current location).

$dir = New-Item "C:\Program Files (x86)\MSBuild\Microsoft\Dynamics\AX" -Type Directory
cp *.targets $dir

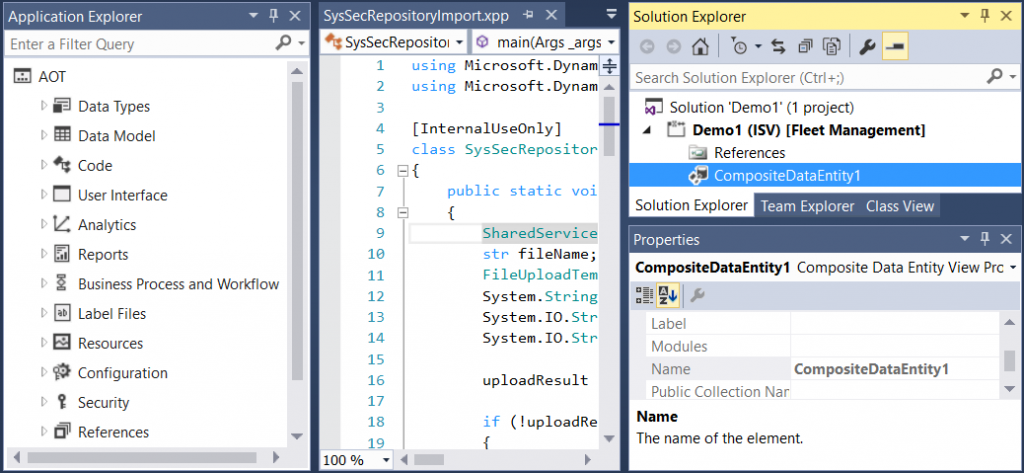
When you run Visual Studio (as administrator), you should be able to open Application Explorer, view code, create AX projects and so on.

But one important thing is missing. When you’re trying to locate an object or you’re familiarizing yourself with the application, you’ll likely use cross references, which we don’t have there in the moment. Let’s fix it.

Cross references

Cross references are stored in a SQL Server database called DYNAMICSXREFDB, therefore go to the source environment, create a full backup of this database and copy the file to your machine. If you have SQL Server installed, connect to it, if not, not an issue – Visual Studio comes with a local DB. You may want to download and install SQL Server Management Studio and then simply connect to a server called (localdb)\MSSQLLocalDB in the same way as if it was a regular SQL Server.

Restore DYNAMICSXREFDB from the file.

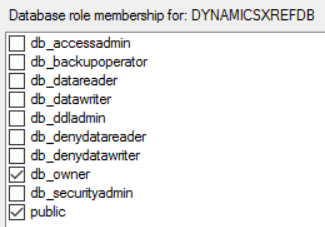
Give yourself sufficient permissions to the database, such as making yourself a database owner.
You have to tell Visual Studio where it’ll find the database, therefore open {Documents}\Visual Studio 2015\Settings\DefaultConfig.xml and change the value of CrossReferencesDatabaseName to (localdb)\MSSQLLocalDB (or your database server if you don’t use local DB).

Update (5 April 2017): Because Visual Studio doesn’t respect CrossReferencesDatabaseName property when updating cross-references and it uses the value of DatabaseServer instead, update DatabaseServer element to the same value as CrossReferencesDatabaseName. Otherwise any attempt to build X++ code may fail, with Visual Studio complaining about not being able to connect to the cross-reference database. This step won’t be needed after this bug gets fixed.

Start Visual Studio again and you can start using references as usual.

Although it doesn’t build a full environment with all features, it fulfills its purpose. Now I can easily carry all AX 7 code with me, exploring it on plane, quickly checking code or property names when somebody asks in a forum and so on. My intention isn’t to stop using VMs from Microsoft for development and testing – on machines powerful enough to run AX (don’t forget that the compiler is designed for 16 GB RAM, for example), I can use the VM as well, so configuring the whole environment on my own installation of Windows would be worth the effort. I did this when I couldn’t use the VM and the time spent with setting it up it is already paying off. Documenting it for others took much more time than that. 🙂
Extensible control – HTML/JavaScript

The first part of this mini-tutorial showed how to create necessary classes for an extensible control. We have X++ classes for a control showing maps, we’ve added the control to a form and set a few properties. Now we have to add some HTML and JavaScript to do the job in browser.

Create a text file on disk, set its name to MyMap.htm and put this HTML code inside:

<div id="MyMap" data-dyn-bind="
    visible: $data.Visible,
    sizing: $dyn.layout.sizing($data)"></div>
 
<script src="https://www.google.com/jsapi"></script>
<script src="/resources/scripts/MyMap.js"></script>

It’s very simple. We have a single div representing our control, with appropriate ID. Then we use data-dyn-bind attribute to set some properties based on data from AX. It’s not strictly necessary for this example, but we would have to set some size anyway, so why not to use the right way?

At the bottom, we refer to some JavaScript files. The first one is the usual Google API, the other is a reference to a JavaScript file that we’ll add in a moment.

Create a new resource in your Visual Studio project, name it MyMapHTM and when asked for a file, use the file that you’ve just created.

We also need a resource for JavaScript. Create a file, MyMap.js, with this content:

(function () {
    'use strict';
    $dyn.controls.MyMap = function (data, element) {
        $dyn.ui.Control.apply(this, arguments);
        $dyn.ui.applyDefaults(this, data, $dyn.ui.defaults.MyMap);
    };
 
    $dyn.controls.MyMap.prototype = $dyn.ui.extendPrototype($dyn.ui.Control.prototype, {
        init: function (data, element) {
            var self = this;
 
            $dyn.ui.Control.prototype.init.apply(this, arguments);
 
            google.load("maps", 3, {
                callback: function () {
                    var map = new google.maps.Map(element, {
                            center: { lat: $dyn.value(data.Latitude), lng: $dyn.value(data.Longitude) },
                            zoom: $dyn.value(data.Zoom),
                            mapTypeId: google.maps.MapTypeId.HYBRID
                        });
                    }
            });
        }
    });
})();

If you have an API key, add it to the load() function in this way:

google.load("maps", 3, {
    other_params:"key=Abcdefg12345",
    callback: function () {

It all works for me without any API key, although it’s officially required. If needed, you can easily create a new API key. And you definitely should provide a key if you use this API in production.

I’m not going to explain the JavaScript code in detail. In short, it loads and calls the Google Maps API when our controls loads, it provides a callback function that sets properties of the map. It’s important to notice how we use values of our properties, such as $dyn.value(data.Latitude). These values come from the runtime class, MyMapControl.

As with HTML, create a resource, call it MyMapJS and add MyMap.js there.

Notice that you can edit resource files directly in Visual Studio.

editresource

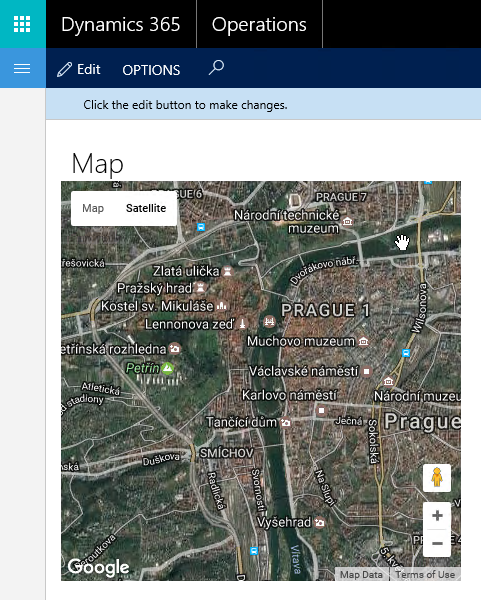
And we’re done! Build the solution, run the form and you should see a map like this:

formwithmap

If you don’t see anything, make sure you’ve set Height and Width of the control, because my implementation doesn’t provide any minimal size.

If you have some other problem, you can use the debugger in Visual Studio (if it’s related to X++ classes), or press F12 in your browser to review DOM, debug JavaScript and so on.

Note that the control doesn’t merely show a picture; it’s a fully functional Google map – you can scroll, zoom the map or switch to StreetView, for example.

This control is deliberately very simple and doesn’t provide any additional logic, but you could easily utilize the JavaScript API to add pins or routes and do a plenty of other useful stuff. The control also doesn’t accept any input from users, so we didn’t need any binding to datasources nor any commands reacting to user actions, although all these things are possible. It’s always good to start with something simple and complicate things only when basics are clear enough.

Let me show just more one thing that the control already supports – setting properties from code.

Open the form in designer, find the map control (MyMapControl1) and set its AutoDeclaration property of to Yes. Then override form’s init() method and put the following code there:

public void init()
{
    super();
 
    MyMapControl1.parmLatitude(48.9745);
    MyMapControl1.parmLongitude(14.474);
    MyMapControl1.parmZoom(16);
}

When you run the form, you should see a map for coordinates provided in code and not those set in properties in designer. That was easy. 🙂

As you see, creating custom controls isn’t that complicated. The X++ classes we wrote have a few dozen lines of code, but they’re actually very simple; they do little more than just defining our three properties. If needed for your controls, you can put any arbitrary logic there and you’ll be able to manage and debug it as any other X++ code. How difficult is building the front end depends on your proficiency in HTML and especially JavaScript. You obviously can’t build a web UI without any knowledge of web technologies, but on the other hand, you build just a control and not the whole application.

When design robust controls, you should take into account several things not needed for simple examples like this, such as localization and responsive design.

Follow documentation (Build extensible controls) to learn more about development of extensible controls.

I think Microsoft made a smart move by designing this framework for extensible control and making it available to everybody. Although it was possible to create custom controls in older versions of AX as well (using ActiveX and managed controls), this is fully integrated (including design-time experience in Visual Studio) and it’s really easy to use. I don’t say it’s completely trivial, but it’s not anything obscure either. I’m looking forward to building more extensible controls myself.

Extensible control – X++ classes

User interface in AX 7 (Dynamics 365 for Operations) is now in web browser, which forced Microsoft to make many fundamental changes. Obviously, they had to rewrite all controls to HTML (plus JavaScript and CSS), but it has many additional consequences. For example, it’s not possible anymore to run X++ code on client; all X++ code runs on server. If something happens in browser, such as you click a button, the browser can still call X++ code on server, but the call over internet is quite slow. Another option is running client-side logic written in JavaScript. In either case, it’s quite different from how older versions of AX worked. On the other hand, it all gives us a plenty of new options.

AX developers usually don’t have to care about any HTML, JavaScript and so on; they deal with controls (such as buttons and grids), both in designer and in X++ code. The whole rendering to HTML, client scripting, communication with server and so on is done by controls themselves, with the help of AX kernel.

That you don’t usually have to care about how control work doesn’t mean that it isn’t useful. It can help you with debugging and exploring capabilities of existing controls, but most importantly it allows you to design new controls for your particular requirements. This is extremely powerful and it’s not too complicated either. Of course, you must know something about HTML and JavaScript, and you’ll find that designing a control that works great in all cases (small resolution, right-to-left languages etc.) isn’t completely trivial, but don’t bother about it right now.

Let’s build a simple control showing a map for given coordinates. I’m not going to dive into much details, explain all capabilities and so on; I want to show a case from beginning to end without any distractions. If you want to build a more useful control, you’ll still have to go to documentation and learn about additional features from there.

First of all, we need a so-called “build class”, which defines how the control behaves at design time in Visual Studio.

Create an X++ class called MyMapControlBuild and paste the following code there:

[FormDesignControlAttribute("My map")]
class MyMapControlBuild extends FormBuildControl
{
    real    latitude;
    real    longitude;
    int     zoom;
 
    [FormDesignPropertyAttribute("Latitude", "Map")]
    public real parmLatitude(real _latitude = latitude)
    {
        if (!prmIsDefault(_latitude))
        {
            latitude = _latitude;
        }
        return latitude;
    }
 
    [FormDesignPropertyAttribute("Longitude", "Map")]
    public real parmLongitude(real _longitude = longitude)
    {
        if (!prmIsDefault(_longitude))
        {
            longitude = _longitude;
        }
        return longitude;
    }
 
    [FormDesignPropertyAttribute("Zoom", "Map")]
    public int parmZoom(int _zoom = zoom)
    {
        if (!prmIsDefault(_zoom))
        {
            zoom = _zoom;
        }
        return zoom;
    }
}

The class inherits from FormBuildControl and has an attribute defining its human-friendly name. It also contains three fields (latitude, longitude and zoom) and corresponding parm* methods, each decorated with FormDesignPropertyAttribute. We’ll see these three properties in the form designer; we’ll be able to set their values and later we’ll use them to show something on the map.

The second argument of FormDesignPropertyAttribute is the category of properties, which seems to be ignored in the moment (but I still think you should use it; hopefully it will become supported later).

Then we need one more class, a so-called “runtime class”. It represents the X++ part of the actual control when rendered in user interface. You could put more logic there, but in this case, we’ll only expose our properties.

Let’s do it in a few steps. Create a new class, MyMapControl, with the following code.

[FormControlAttribute('MyMap', '', classstr(MyMapControlBuild))]
class MyMapControl extends FormTemplateControl
{
    public void new(FormBuildControl _build, FormRun _formRun)
    {
        super(_build, _formRun);
 
        this.setTemplateId('MyMap');
        this.setResourceBundleName('/resources/html/MyMap');
    }
}

Create three FormProperty variables.

FormProperty latitude;
FormProperty longitude;
FormProperty zoom;

For each property, add a parm* method decorated with FormPropertyAttribute. These properties will be available in JavaScript in browser.

[FormPropertyAttribute(FormPropertyKind::Value, "Latitude")]
public real parmLatitude(real _value = latitude.parmValue())
{
    if (!prmIsDefault(_value))
    {
        latitude.setValueOrBinding(_value);
    }
 
    return latitude.parmValue();
}
 
[FormPropertyAttribute(FormPropertyKind::Value, "Longitude")]
public real parmLongitude(real _value = longitude.parmValue())
{
    if (!prmIsDefault(_value))
    {
        longitude.setValueOrBinding(_value);
    }
 
    return longitude.parmValue();
}
 
[FormPropertyAttribute(FormPropertyKind::Value, "Zoom")]
public int parmZoom(int _value = zoom.parmValue())
{
    if (!prmIsDefault(_value))
    {
        zoom.setValueOrBinding(_value);
    }
 
    return zoom.parmValue();
}

We also need to initialize FormProperty objects and associate them with parm* methods. Put this code to the constructor, below super().

latitude = properties.addProperty(methodStr(MyMapControl, parmLatitude), Types::Real);
longitude = properties.addProperty(methodStr(MyMapControl, parmLongitude), Types::Real);
zoom = properties.addProperty(methodStr(MyMapControl, parmZoom), Types::Integer);

The last missing piece is the initialization of the control from the build class. We take values of designer properties and put them into our actual control.

public void applyBuild()
{
    super();
 
    MyMapControlBuild build = this.build();
 
    if (build)
    {
        this.parmLatitude(build.parmLatitude());
        this.parmLongitude(build.parmLongitude());
        this.parmZoom(build.parmZoom());
    }
 
}

Here is the complete class, so you can easily copy and paste the code.

[FormControlAttribute('MyMap', '', classstr(MyMapControlBuild))]
class MyMapControl extends FormTemplateControl
{
    FormProperty latitude;
    FormProperty longitude;
    FormProperty zoom;
 
    public void new(FormBuildControl _build, FormRun _formRun)
    {
        super(_build, _formRun);
 
        this.setTemplateId('MyMap');
        this.setResourceBundleName('/resources/html/MyMap');
 
        latitude = properties.addProperty(methodStr(MyMapControl, parmLatitude), Types::Real);
        longitude = properties.addProperty(methodStr(MyMapControl, parmLongitude), Types::Real);
        zoom = properties.addProperty(methodStr(MyMapControl, parmZoom), Types::Integer);
    }
 
    public void applyBuild()
    {
        super();
 
        MyMapControlBuild build = this.build();
 
        if (build)
        {
            this.parmLatitude(build.parmLatitude());
            this.parmLongitude(build.parmLongitude());
            this.parmZoom(build.parmZoom());
        }
    }
 
    [FormPropertyAttribute(FormPropertyKind::Value, "Latitude")]
    public real parmLatitude(real _value = latitude.parmValue())
    {
        if (!prmIsDefault(_value))
        {
            latitude.setValueOrBinding(_value);
        }
 
        return latitude.parmValue();
    }
 
    [FormPropertyAttribute(FormPropertyKind::Value, "Longitude")]
    public real parmLongitude(real _value = longitude.parmValue())
    {
        if (!prmIsDefault(_value))
        {
            longitude.setValueOrBinding(_value);
        }
 
        return longitude.parmValue();
    }
 
    [FormPropertyAttribute(FormPropertyKind::Value, "Zoom")]
    public int parmZoom(int _value = zoom.parmValue())
    {
        if (!prmIsDefault(_value))
        {
            zoom.setValueOrBinding(_value);
        }
 
        return zoom.parmValue();
    }
}

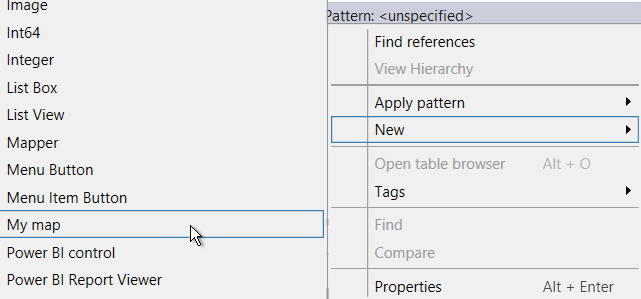
Build the solution, create a new form and add the new control, My map (the name comes from FormDesignControlAttribute).

Control selection

We can’t successfully run the form yet, because we still haven’t defined how the control should render, but we can work with the control in designer, set its properties, possibly override its methods and so on.

designer

If you open properties, you’ll see our three custom properties (Latitude, Longitude and Zoom), together with many other properties common to all controls (such as Visible). I would expect to see a new group of properties, Map, but it’s not how it works in the moment.

Fill in your favorite GPS coordinates, a zoom level and the required size of the control.

properties

This is all for now, we’ll add HTML and JavaScript in the next blog post.

Find assembly for a given type – in AX 7

Five years ago, I wrote a blog post called Assembly containing a given type, demonstrating how to find the assembly where a given type is defined. I needed the same thing in AX 7, but instead of using the same code, I decided to utilize the fact that I can now easily write parts of my application in C#.

I added a C# class library project to the assembly with my X++ project and created a class with this method:

public static System.Reflection.Assembly findAssembly(string typeName)
{
    var assemblies = AppDomain.CurrentDomain.GetAssemblies();
    return assemblies.FirstOrDefault(a => a.GetType(typeName, false, true) != null);
}

I built the solution, went to my X++ project and added a project reference to the C# project. (Right-click References node, choose Add reference…, select the project on the Projects tab and confirm.)

This allowed me to call my C# method from X++, which I did:

var assembly = MyClassLibrary.MyClass::findAssembly('Dynamics.AX.Application.AsyncTaskResult');
if (assembly != null)
{
    info(assembly.FullName);
    info(assembly.Location);
}

I saved a few lines of code, but more importantly I showed you how easy it is to use C# projects together with X++ projects. It’s extremely powerful, because C# (and other .NET languages) give you quite a few options that you don’t have in X++ (although it’s not the case of this particular example).

Installing deployable packages with Powershell

Installing deployable packages to an AX 7 environment can often be done just by a few clicks on LCS (as described in Apply a deployable package on a Microsoft Dynamics 365 for Operations system). Unfortunately the situation isn’t always that simple and you may have to install the package manually, using the process explained in Install a deployable package. It consists of quite a few manual steps and where there are repeated manual steps, one should always consider automation.

I’ve built a few Powershell functions to help with these tasks:

#region Parameters
$folder = 'C:\Temp'
$archiveFileName = 'Updates.zip'
$runbookId = 'MyRunbook1'
$ErrorActionPreference = 'Stop'
#endregion
 
#region Derived values
$file = Join-Path $folder $archiveFileName
$runbookFile = Join-Path $folder "$runbookId.xml"
$extracted = Join-Path $folder ([System.IO.Path]::GetFileNameWithoutExtension($archiveFileName))
$topologyFile = Join-Path $extracted 'DefaultTopologyData.xml'
$updateInstaller = Join-Path $extracted 'AXUpdateInstaller.exe'
#endregion
 
Function ExtractFiles
{
    Unblock-File $file
    Expand-Archive -LiteralPath $file -Destination $extracted
}
 
Function SetTopologyData
{
    [xml]$xml = Get-Content $topologyFile
    $machine = $xml.TopologyData.MachineList.Machine
 
    # Set computer name
    $machine.Name = $env:computername
 
    #Set service models
    $serviceModelList = $machine.ServiceModelList
    $serviceModelList.RemoveAll()
 
    $instalInfoDll = Join-Path $extracted 'Microsoft.Dynamics.AX.AXInstallationInfo.dll'
    [void][System.Reflection.Assembly]::LoadFile($instalInfoDll)
 
    $models = [Microsoft.Dynamics.AX.AXInstallationInfo.AXInstallationInfo]::GetInstalledServiceModel()
    foreach ($name in $models.Name)
    {
        $element = $xml.CreateElement('string')
        $element.InnerText = $name
        $serviceModelList.AppendChild($element)
    }
 
    $xml.Save($topologyFile)
}
 
Function GenerateRunbook
{
    $serviceModelFile = Join-Path $extracted 'DefaultServiceModelData.xml'
    & $updateInstaller generate "-runbookId=$runbookId" "-topologyFile=$topologyFile" "-serviceModelFile=$serviceModelFile" "-runbookFile=$runbookFile"
}
 
Function ImportRunbook
{
    & $updateInstaller import "-runbookfile=$runbookFile"
}
 
Function ExecuteRunbook
{
    & $updateInstaller execute "-runbookId=$runbookId"
}
 
Function RerunRunbook([int] $step)
{
    & $updateInstaller execute "-runbookId=$runbookId" "-rerunstep=$step"
}
 
Function SetStepComplete([int] $step)
{
    & $updateInstaller execute "-runbookId=$runbookId" "-setstepcomplete=$step"
}
 
Function ExportRunbook
{
    & $updateInstaller export "-runbookId=$runbookId" "-runbookfile=$runbookFile"
}

When you set parameters (such as the name of your package file) and run the script, you can then execute whole process by the following list of function calls:

ExtractFiles
SetTopologyData
GenerateRunbook
ImportRunbook
ExecuteRunbook

If needed, you can also use RerunRunbook and SetStepComplete (e.g. SetStepComplete 10).

Note that SetTopologyData takes data just from the current machine, but you can borrow the code and modify it, if you need something more sophisticated.

This should make things a bit easier and reduce unnecessary errors such as mistyped runbook IDs.