All technologies mentioned in the title – Dynamics AX, LINQ (Language Integrated Query) and WPF (Windows Presentation Foundation) – are quite complex and it may sound strange to mix them together. But I want to show how they can be used to make complicated things simpler.
We’ll create a simple WPF application showing data from Dynamics AX. LINQ to AX, a new feature of Dynamics AX 2012 R2, will serve as a bridge between AX and the WPF application. You can find more information about LINQ to AX in MSDN article Code Example: LINQ to AX from C#, but although it shows many features, you may struggle to immediately see how useful the whole thing is. I’ll try to be more demonstrative, but you’ll have to look to MSDN for more details.
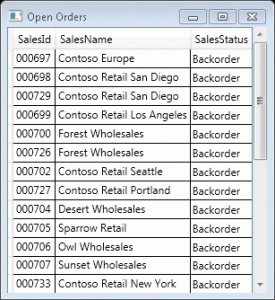
The result will be an application like on the picture below. It reads sales orders from Dynamics AX, filters them and displays them in a grid. You can scroll the content, select records and sort them by a specific column. It’s not too much functionality but it’s good enough for demonstration.

I must warn you that the following approach isn’t – surprisingly – supported by Microsoft and therefore it doesn’t work ideally, but I believe it will change later.
Prerequisites
- Dynamics AX 2012 R2
- Visual Studio 2010
Project preparations
- Create a new project in Visual Studio – use C# language and WPF Application template.
- Open project properties and change target framework to .NET Framework 4.
- Open app.config file and change the opening tag of the startup element to <startup useLegacyV2RuntimeActivationPolicy=”true”>.
- Add references to LINQ to AX assemblies = add references to all (three) files beginning with Microsoft.Dynamics.AX.Framework.Linq.Data from AX client bin folder (e.g. C:\Program Files (x86)\Microsoft Dynamics AX\6.0\Client\Bin\).
Proxies
- Add the project to AOT (right-click the project and choose Add {project name} to AOT)
Adding a WPF project to AOT has one unfortunate side-effect – the project can’t be run and debugged inside Visual Studio anymore. Don’t bother with it in right now; I’ll return to this topic later.
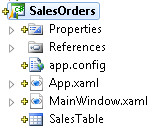
- Open Application Explorer and drag SalesTable table to the project. In this moment, the project should look like this:

Coding
- Open MainWindow.xamland add the following code to the grid:
<ScrollViewer>
    <DataGrid x:Name="grid" AutoGenerateColumns="True" />
</ScrollViewer>
The ScrollViewer simply provides scrollbars.
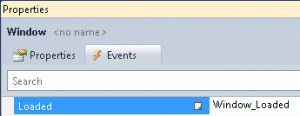
The DataGrid will show data from AX and it will even generate columns automatically. We don’t use any data binding here, because we’re going to set data in C# code (that’s why the control has x:Name attribute). - Select the Window control in XAML and open its events (in the Properties pane). Double-click the Loaded event – it will generate and open an event handler method.

Just for reference, this is how the complete XAML code should look like:<Window x:Class="SalesOrders.MainWindow" xmlns="http://schemas.microsoft.com/winfx/2006/xaml/presentation" xmlns:x="http://schemas.microsoft.com/winfx/2006/xaml" Title="Sales Orders" Height="350" Width="525" Loaded="Window_Loaded"> <Grid> <ScrollViewer> <DataGrid x:Name="grid" AutoGenerateColumns="True" /> </ScrollViewer> </Grid> </Window>
- Go to C# code (MainWindow.xaml.cs) and before anything else, add the following using statements on the top of the file:
using Microsoft.Dynamics.AX.ManagedInterop;
using Microsoft.Dynamics.AX.Framework.Linq.Data;
- Go to the event handler (Window_Loaded) and insert code for loading data from AX:
Session axSession = new Session();
axSession.Logon(null, null, null, null);

QueryProvider provider = new AXQueryProvider(null);
var salesTables = new QueryCollection<SalesTable>(provider);

var orders = from st in salesTables
             where st.SalesStatus != SalesStatus.Invoiced
             select new { st.SalesId, st.SalesName, st.SalesStatus };

grid.ItemsSource = orders.Take(100);
The Session object provides connection to AX.
The QueryProvider processes LINQ queries.
The QueryCollection wraps SalesTable proxy so it can be used in LINQ.
Then we create a simple LINQ query – we take non-invoiced sales orders and select three fields.
The last statement loads first 100 orders and assigns them to the data grid. Yes, it’s that simple.
Running
Now build the solution and the application is ready. Unfortunately it can’t be run directly from Visual Studio, therefore open the project folder (you can right-click the project and choose Open Folder in Windows Explorer) and navigate to bin/Debug. Run the .exe file there (SalesOrders.exe in my case). Hopefully everything works!
Running in Visual Studio
It’s obvious that running applications directly inside Visual Studio is much more efficient. I don’t know what’s the problem with WPF Application project template – Microsoft told me that it’s not supported but I hope they’ll change their mind.
We still can build the application shown above and run it in Visual Studio, it just requires few more steps (and has its own drawbacks). The idea is based on the fact that although WPF applications can’t be run in Visual Studio after adding to AOT, console applications can. It might be possible to find the root cause, but for now let’s just build a WPF application using Console Application project.
- Create Console Application project.
- Go to project properties and change:
- Target framework to .NET Framework 4
- Output type to Windows Application
- Adjust app.config as described above
- Add references to:
- LINQ to AX assemblies (described above)
- WindowsBase
- PresentationCore
- PresentationFramework
- System.Xaml
- Add the project to AOT
- Drag SalesTable from Application Explorer to the project
- Copy MainWindow.xaml and App.xaml from the WPF application that we built a moment ago. Set their Build Actions to:
- ApplicationDefinition for App.xaml
- Page for MainWindow.xaml
- ApplicationDefinition for App.xaml
- Update namespace of MainWindow and App classes in both XAML and C# (if needed)
- Build the solution
Now you can run and debug the application from Visual Studio as usual. These additional steps take few minutes, but you’ll get them back very quickly if you need to debug anything.
Conclusion
The application I showed is trivial – it would require more work to build a real-world application. But that’s always the case with demonstrative examples. The real point is to realize how much effort it would take to create this simple application with older technologies. Now it’s quick, easy and type-safe. And obviously you could easily use more complex LINQ queries and richer WPF UI and so on.
As always, it’s not completely without issues. The problem with WPF Application projects is one of them. I also discovered some suspicious behavior of some LINQ queries (I need to run more tests before reporting it to Microsoft). But hopefully it’s all only temporary. It’s still fantastic how we’re continuously getting more and easier options to integrate AX with other applications and benefit from existing tools and frameworks.
If you don’t know LINQ, I warmly recommend you to take a look. It’s a beautiful technology and you’ll be able to use it for working with many other things in .NET (e.g. objects, data in databases or XML files).
Nice post!
Question : Does this also work with the skip and take? We need to implement paging en we need skip to work. But I cannot seem to get it to work. I’m afraid this is not supported.
Kind regards,
Kenny
Take() is not a problem, it’s even shown in the post. Skip() is, unfortunately, another story. If you look at MSDN, you’ll see that:
* LINQ to AX does not support the Skip extension method.
* LINQ to AX does not support the into keyword.
* LINQ to AX does not support indexed queries.
* LINQ to AX does not have the extension methods named InsertOnSubmit and DeleteOnSubmit that LINQ to SQL has. Instead, you use the insert and delete methods that proxies for tables have.
* LINQ to AX has its own ForUpdate extension method.
Martin,
I followed your tutorial and made some simple control and it was working. I also tried to follow same example from your tutorial and it is partly working. I would like to see what you done in c# , because this code is incomplete. I would like to ask you, is it possible to send me C# code from this example.
Regards Lily
Hi lily, I don’t have the complete solution on hand, but there really shouldn’t be any other code to write. What exactly do you miss?